
A Beginner’s Guide to Growing Cut Flowers in Hot Climates
Disclaimer: This post contains affiliated links such as Amazon, I make a small commission from purchases made through those links at no extra cost to you. I only promote products that I know and love! See my disclosure policy for more information
Can you grow cut flowers in hot climates? Yes! You can absolutely grow them in hot climates, you just need to know a few tips and tricks to be successful!
In this post I will walk you through the basics of starting and maintaining a cut flower garden, how to choose the right varieties as well as where to source your plants, seeds and tubers! Plus, all the tips and tricks to successfully grow cut flowers in hot climates.
The basics for growing cut flowers are the same no matter what your climate is like, so if you’re new to growing flowers you will still find this post helpful even if you don’t live in a hot climate.

There’s something so magical about flowers and the way they bring happiness to anyone they meet. I just love having fresh flowers in my home, making bouquets and simply being surrounded by them in the garden, so naturally I became hooked once I started growing them!
When I first tried my hand at growing flowers, I thought that I couldn’t grow many of my favorites due to my hot climate but I couldn’t have been more wrong. It turns out, that the key to growing them is knowing what to plant and when based on each plant’s growing conditions.
In Central Florida, Zone 9, our summers get extremely hot and our winter and early spring months are mild, resembling a northern climate’s spring temperatures. What many gardeners consider spring and summer annual flowers simply can not handle the extreme heat of hot climate summers and most northern perennials like foxgloves and delphiniums are considered annuals in hot climate growing zones. So, how do we grow cool-season flowers when we don’t have cool spring temperatures and mild summers? Simple, we grow ours in the fall and winter months!
There are so many beneficial reasons to grow flowers and just because you live in a hot climate doesn’t mean that you can’t grow many of the ones that you love. Sure, it can have it’s challenges like everything else and there are some flowers that simply won’t grow in hot climates no matter how hard you try, looking at you, peonies, but it shouldn’t deter you. With the right knowledge it’s not as intimidating as it might seem and you’ll be overflowing in fresh bouquets before you know it!
why grow your own flowers?
Well for starters, growing your own flowers is much more sustainable than buying them from your local store. According to American Grown Flowers, only 22% of the flowers and foliage sold in the United States is locally grown and the rest is imported from other countries. Not only does transporting flowers in from other countries result in a high carbon foot print, but most of the flowers are treated with harmful herbicides and pesticides that make their way into our homes and the environment.
Another great reason to grow your own cut flowers is that you can grow many types of flowers that you won’t typically find from a local florist or store. This is because many flowers such as dahlias, zinnias and snapdragons do not ship well so unless you have a local grower you will not find these flowers in your area.
Lastly, growing flowers is just simply good for your mind, body and soul. Not only will you get some great exercise tending to your flowers but just being outside and around flowers brings so much joy. Not to mention, you will also have plenty of extra bouquets so that you can spread joy and kindness to other people.
What is a Cut Flower?
Before we begin, you may be wondering what a cut flower even is? A cut flower is any flower that is being growing with the purpose of being cut and used for décor and other purposes such as making flower arrangements, dried flowers and decorating cakes!
While you can certainly grow them in your landscape beds for aesthetic purposes, you typically grow them much like a traditional vegetable garden with the purpose of harvesting them.
Types of Cut Flowers
There are two types of flowers when it comes to growing cut flowers, you have your annual flowers, which is what you will be learning to grow in this post, and then you have perennials.
Perennials are plants that last for many seasons. You plant them once and they continue to put out flowers and foliage for many years. Many perennials only flower once a year while others may have many bloom cycles. Some examples of common perennials used for cutting include roses and peonies.
Annuals on the other hand only last one or two seasons and will bloom continuously throughout the season. Some annuals like zinnias and cosmos are cut and come again meaning the more you harvest flowers, the more flowers they will produce. Other annuals like single stem stock and sunflowers produce one flower and are done after you harvest them.
How to grow cut flowers in Hot Climates
timing
When it comes to growing cut flowers in hot climates, timing is key. I’ve said this many times before and I can’t say it enough, ignore those planting (and spacing) instructions on the back of those seed packets. They are more geared for cooler climate gardeners that have traditional spring conditions. Our timing is completely backwards in hot climates.
The way to know when the right time to plant a certain flower crop is to know what conditions it grows best under, mainly what temperatures it thrives in. There are cool-season flowers and then there are warm-season flowers. Knowing which flower falls in to which category and becoming familiar with your local climate will help you determine when to plant your flowers. You can read more in depth about this subject in my previous post: A Beginner’s Guide to Starting a Garden: in 7 Simple Steps.
Cool-Season FlowersCool-season flowers are flowers that thrive in cooler temperatures. Most of these flowers will survive a light frost and some will even benefit from freezing temperatures. If you live in a hot climate then you will want to begin planting these crops in the fall. They will grow slowly during the fall and winter months then really take off as the weather warms a bit, usually giving you blooms in as early as January and lasting until it gets too hot.
Some flowers on the list below, like Strawflowers and Queen Anne’s Lace, thrive in cooler weather but can also handle warmer temperatures, just not the extreme heat of summer. So treat them like cool-season flowers and plant them in the fall/winter but know that you may get an extended harvest from them as temperatures warm up.
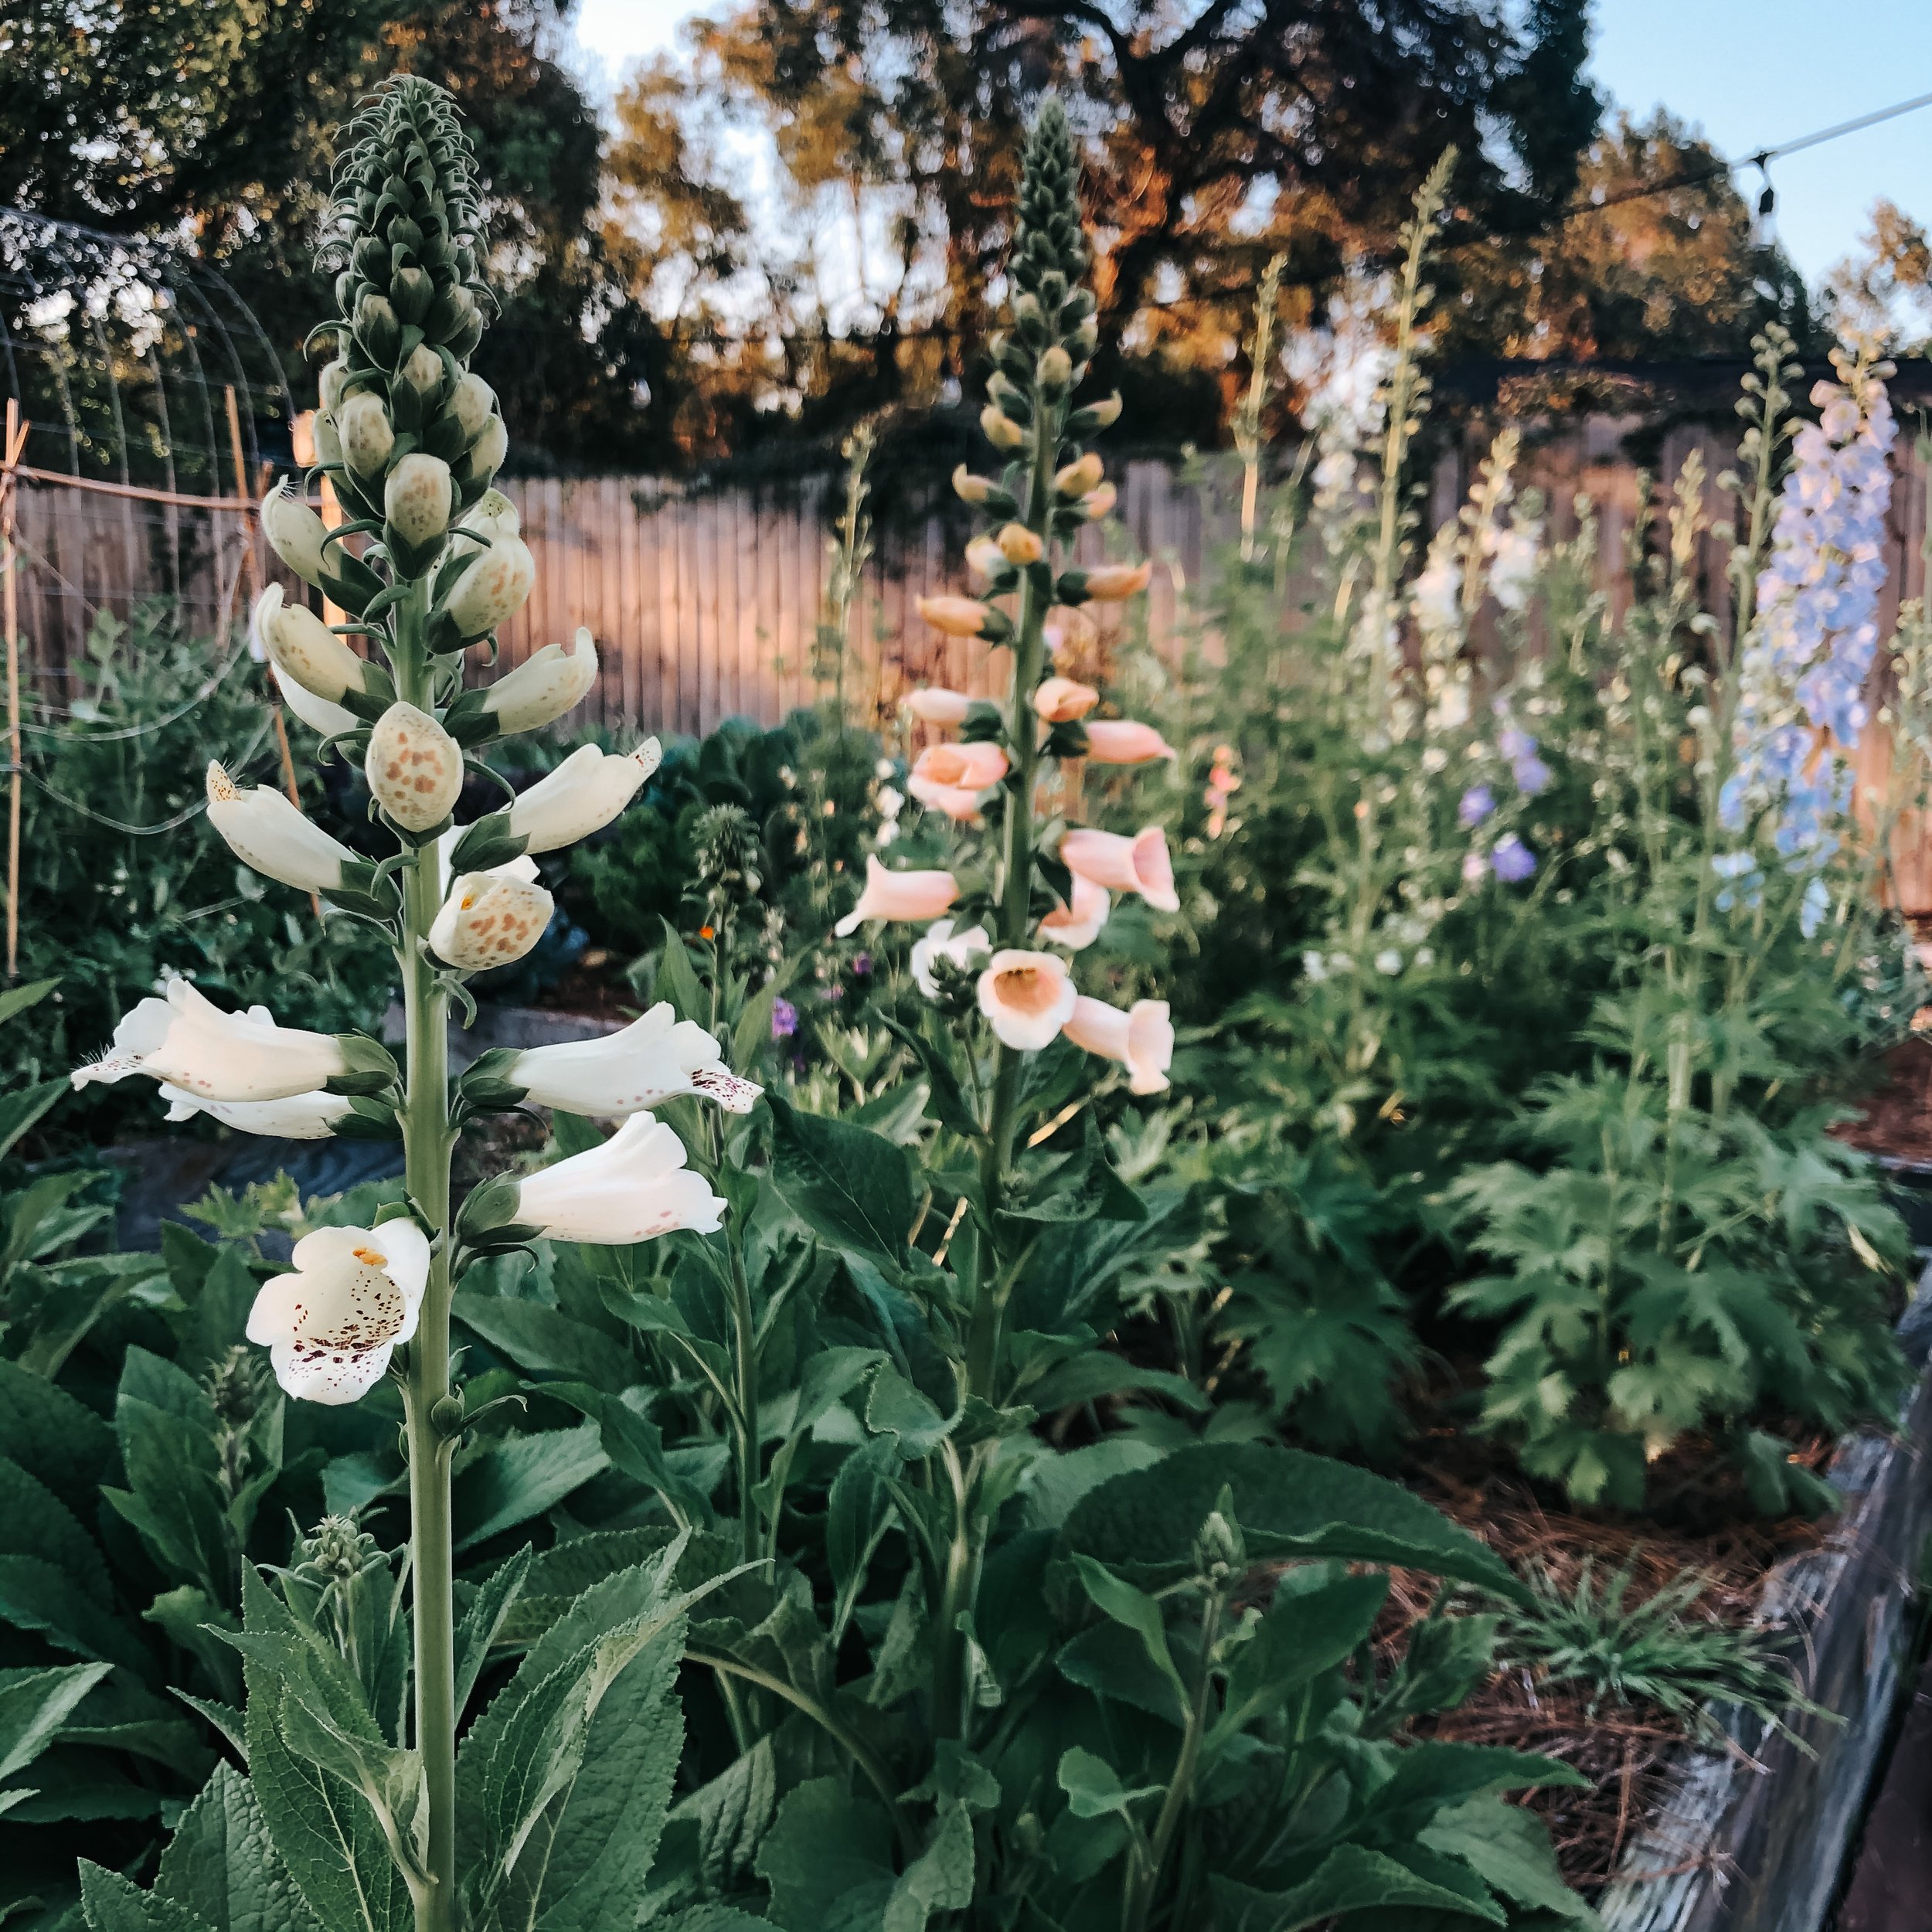
Cool-season flowers include Delphiniums and Foxgloves which were planted as plugs in November for spring blooms.
Cool-season flowers and foliage plants include:
(*) = likes cooler temperatures but can tolerate some warmer temperatures as well.
Agrostemma
Bells of Ireland
Ammobium (Winged Everlasting) (*)
Forget-me-Nots (*)
Larkspur
Delphinium
Foxglove
Snapdragons (*)
Statice (*)
Stock
Strawflower (*)
Orlaya
Didiscus/Laceflower
Dianthus & Carnations
Sweet Peas
Honeywort (*)
Nigella
Pansies & Violas
Queen Anne’s Lace (Dara) (*)
False Queen Anne’s Lace (Ammi) (*)
Scabiosa
Lisianthus (*)
Anemone
Ranunculus
Poppies
Phlox
Calendula
Baby’s Breath
Bupleurum
Mint (*)
Euphorbia Snow on the Mountain
Warm-Season FlowersWarm-Season flowers thrive in the heat so you will typically plant these spring through early fall depending on your first and last frost dates. These heat loving flowers are also tender meaning that they are frost sensitive and can not withstand freezing temperatures. These flowers love the warm temperatures and there are some flowers that will easily withstand the extreme heat of summer, while others might not do as well during the hottest months of the year.
Summers can be rough here in Florida with our torrential downpours, extreme heat and relentless pests so I typically take the hottest months of the year off from gardening. I like to do a round of warm-season crops in early spring then another round in late summer and early fall before my cool-season crops go in.

Zinnias thrive in the heat and come in an array of colors. They are a great choice for beginner gardeners.
Warm-Season Flowers and Foliage Plants Include:
(*) = likes warm temperatures but can’t tolerate extreme heat so plant early in the spring or fall months
Amaranth
Ageratum (*)
Celosia
Cosmos (*)
Gomphrena
Marigolds
Tithonia/Mexican Sunflower
Sunflowers
Zinnias
Basil
Dill (*)
Eucalyptus
Dahlias (*)
Strawflower (*)
Rudbeckia
Queen Anne’s Lace (Dara) (*)
False Queen Anne’s Lace (Ammi) (*)
Prepping your Garden
where to grow your flowers
Now that you have an idea of when to grow your cut flowers, its time to start thinking about how you are going to grow them!
You can grow buckets full of flowers no matter how big or small your space is. Your space and budget will help you determine whether you want to plant them in the ground, in raised beds or in containers.

This small 4’x8’ raised bed was one of my very first cut flower gardens and it grew buckets full of flowers all season long. This is a great example of how you don’t need much space to grow flowers.
In Ground BedsIn ground beds are simply beds in the ground where you have cleared grass and debris and amended with compost and fertilizer. This is the most budget friendly option.
You can choose to make rows of garden beds specifically for your cut flowers much like a traditional vegetable garden or you can plant them into your landscape beds to create a cottage garden feel making it both beautiful and productive.

This is my current cut flower garden when I first created it. Creating in-ground beds is the most cost efficient way to grow your flowers.
Raised BedsRaised beds are another option to grow your cut flowers in. This is personally my favorite way to garden for both aesthetic reasons and convenience purposes.
Raised beds are also an ideal choice for those with poor soil, you can even place them on a concrete slab if you have no ground to work with. Unfortunately this is also the most expensive option.
Beds can be made out of wood or metal, be short or tall. You can also choose to build beds yourself or get a raised bed kit that you can put together on your own. The possibilities are endless depending on your budget and needs.
ContainersLastly, you can opt to grow your flowers in containers. This can be anything such as flower pots, grow bags, buckets, and pretty much anything that holds soil, has drainage holes and is large enough for the type of plant you will be growing in it. The creative opportunities are endless.
Containers are budget friendly and are perfect for those with limited space. I’ve even seen some beautifully productive gardens on roof tops and apartment balconies so don’t let your limited space discourage you.
Choosing a location for your garden
One the most important parts of starting a cut flower garden is picking the right location to grow your flowers. I will briefly go over how to choose the right location and how to prep your garden beds for planting in this post but you can read more in depth about this subject in my previous post: A Beginner’s Guide to Starting a Garden: in 7 Simple Steps. This is a great, informative post for anyone looking to set their garden up for success.
When it comes to choosing a location, there are 3 things you want to keep in mind. First is sun exposure, in order your plants to thrive and provide you with loads of flowers you want to make sure that your location gets a minimum of 6 hours of direct sunlight a day. Make sure to note both the summer and winter sun exposure because often times a location that gets full sun in summer may get very little in the winter. If you can pick a location that gets morning sun and afternoon shade then that is ideal, especially for hot climates.
Second is location to a water source. Whether you choose to hand water or use irrigation, you’re going to need to water you plants a few times a week in the cooler months and daily in the summer months. The last thing you want to do is get your garden set up just to find out that you can’t water them!
Finally, when choosing a location, be sure to pick a space that drains well and never has standing water. Also make sure that the location that you choose is not infested in any invasive weeds. I made this mistake with my first garden before I knew what Nutsedge was, and let me tell you it was a nightmare. So save yourself the trouble and be sure to pick a location without any aggressive weeds.
Soil & Amendments
When setting up your garden you are going to want to have rich, healthy soil that drains well. If you are choosing the in-ground garden method be sure to do a soil test first before adding any compost or amendments. Often times our native soil, even my sandy, Florida soil has more nutrients than we realize, especially when it comes to Phosphorus (P). Having an excess of nutrients can be just as detrimental as not having enough except that it is a much harder problem to remediate. Getting a soil test done before amending your soil will save you time and money down the road. Once you get your soil test you can top your beds with 2”-4” of compost and amend with the proper nutrients. Depending on the nutrients that I need, I usually opt for amending with an all purpose, slow release fertilizer, or specific amendments such as blood meal, bone meal and kelp meal.
If you choose to grow your flowers in raised beds then you want to make sure that your beds are a minimum of 12” deep if growing on top of bare ground and 18”-24” if your raise bed is sitting on top of concrete or if your beds have a bottom on them preventing the roots from reaching the soil beneath the bed. Make sure to fill at least the top 12” of your bed with high quality potting soil, Fox Farm’s Coco Loco Potting mix is one of my favorites, and amend with the appropriate fertilizers.
Just like with raised beds, you will want to make sure that your container is large enough, has adequate drainage and that you fill it with high quality potting soil and appropriate amendments.
Planning Your Garden
Before you start planning out your garden, lets talk about what it takes to create amazing, well balance bouquets. Bouquet flowers are categorized into the following groups; focal flowers, spikes, disks, airy elements, and fillers.
Focals: large, showy flowers that are the main pieces of your bouquet. These include things like large Zinnias, Sunflowers, Anemones, Ranunculus and Roses.
Spikes: vertical flowers like Snapdragons, Stock and Foxglove
Disks: round flowers that help to fill in your bouquet. These include flowers like Calendula, Marigolds, small Zinnias, Rudbeckia and Cosmos.
Fillers: foliage plants and flowers with a lot of greenery, these help fill your bouquet to add interest like Celosia, Honeywort, Euphorbia and Basil.
Airy Elements: delicate flowers and grasses that add a bit of whimsy to your bouquet. These include Nigella, Forget-me-Nots, Orlaya and Bachelor Buttons

Bouquet of ranunculus, anemones, and dill.
Something that I’ve always referred to when creating amazing bouquets is Floret Flower’s recommended bouquet recipe, which includes a 20% mix of focals, spikes and airy elements, 30% disks, and 50% fillers. Now, I know that this may sound a bit overwhelming but its not as hard as you think! Just a pick a flower or two from each group and use the percentages in the recipe to plan out your garden space.
For example, you know that you want around 50% of your cut flower garden to be filled with foliage or filler flowers, 20% to be a mix of focal flowers, spikes and airy elements and so on.
Now that you know how to create beautiful bouquets, start thinking about what flowers and color schemes that you like and choose the appropriate flowers for the season in which you plan to start your cut flower garden.
It’s easy to go crazy and grow all of the flowers but my advice is to start small and choose to grow only a few varieties your first season. Starting small is a great way to easy into it and build your confidence before trying to grow some of the more difficult flowers.
An example of an easy beginner cut flower garden for spring/early summer may look something like this:
Focal Flowers- Large Zinnias and Sunflowers
Spikes: Snapdragons
Airy Elements: Forget-me-Nots and Bachelor Buttons
Disks: Queen Anne’s Lace, Cosmos and Marigolds
Fillers: Celosia and Basil
Choosing Which Varieties to Grow
When choosing which varieties to grow, you want to pick varieties that are bred specifically for cut flower production. These varieties will have longer stems and a more uniform growth habit.
Sunflowers are a good example as to why you should pick certain varieties, you don’t want pick any old sunflower. Make sure to choose a pollenless variety like the Procut Series Sunflowers or you will have pollen all over your dinning room table where you have your bouquet sitting. I may or may not know this from experience… oops.
Where to Get your Seeds and Plants
When it comes to sourcing plants for your garden, you have a few options. The most cost efficient option is to buy seeds and grow your own plants. While this is a bit more time consuming, you can get a packet of seeds for $5.00 or buy 1 plant for the same price. Another great thing about growing from seeds is that you have endless options on the varieties that you can grow when compared to buying plant starts.
The other option is to buy plugs, which are small plants in individual cells that are ready to be transplanted. The only downfall to buying plugs is that you usually have to buy them in large quantities of 128 or more so this may not be ideal for the gardener with limited space. If you have another gardener to share with then this may be a good option for you. You may also be able to find reasonable quantities of plant starts or plugs from companies like Burpee.
While it is possible to find some plants appropriate for cutting at your local nursery, I would advise against it. You will more than likely find plants that are compact and more suited for garden and landscape beds, unfortunately they are not going to have stems long enough for bouquets.
Below are my favorite tried and true sources for buying cut flower seeds, tubers, corms, bulbs and plugs. While there are many other companies to choose from, these are places that I have personally had good experiences with.
Seeds:
Tubers, Corms and Bulbs:
Plugs:
Planting
When and How to Start Seeds
Knowing when to start your seeds depends on each flower’s preferred growing conditions. As we now know, cool-season flowers are hardy annuals that like colder temperatures while warm-season flowers are tender annuals that need warm temperatures. Becoming familiar with your region’s climate and understanding what growing conditions certain flowers need will help you determine when to start your seeds.
If you live in a hot climate with mild winters then you will start your cool-season flowers in late fall and early winter so that they can slowly grow throughout the winter months and bloom in early spring. Warm-season flowers will be planted out after your last frost date in early spring and they will bloom until early to mid summer.
If you live in colder climates then you will need to adjust your planting schedule to your first and last frost dates.
Many seeds can be directly sown into the garden like zinnias, cosmos and sunflowers while others do much better being started indoors. Your seed packet will tell you the recommended planting method based on germination requirements.
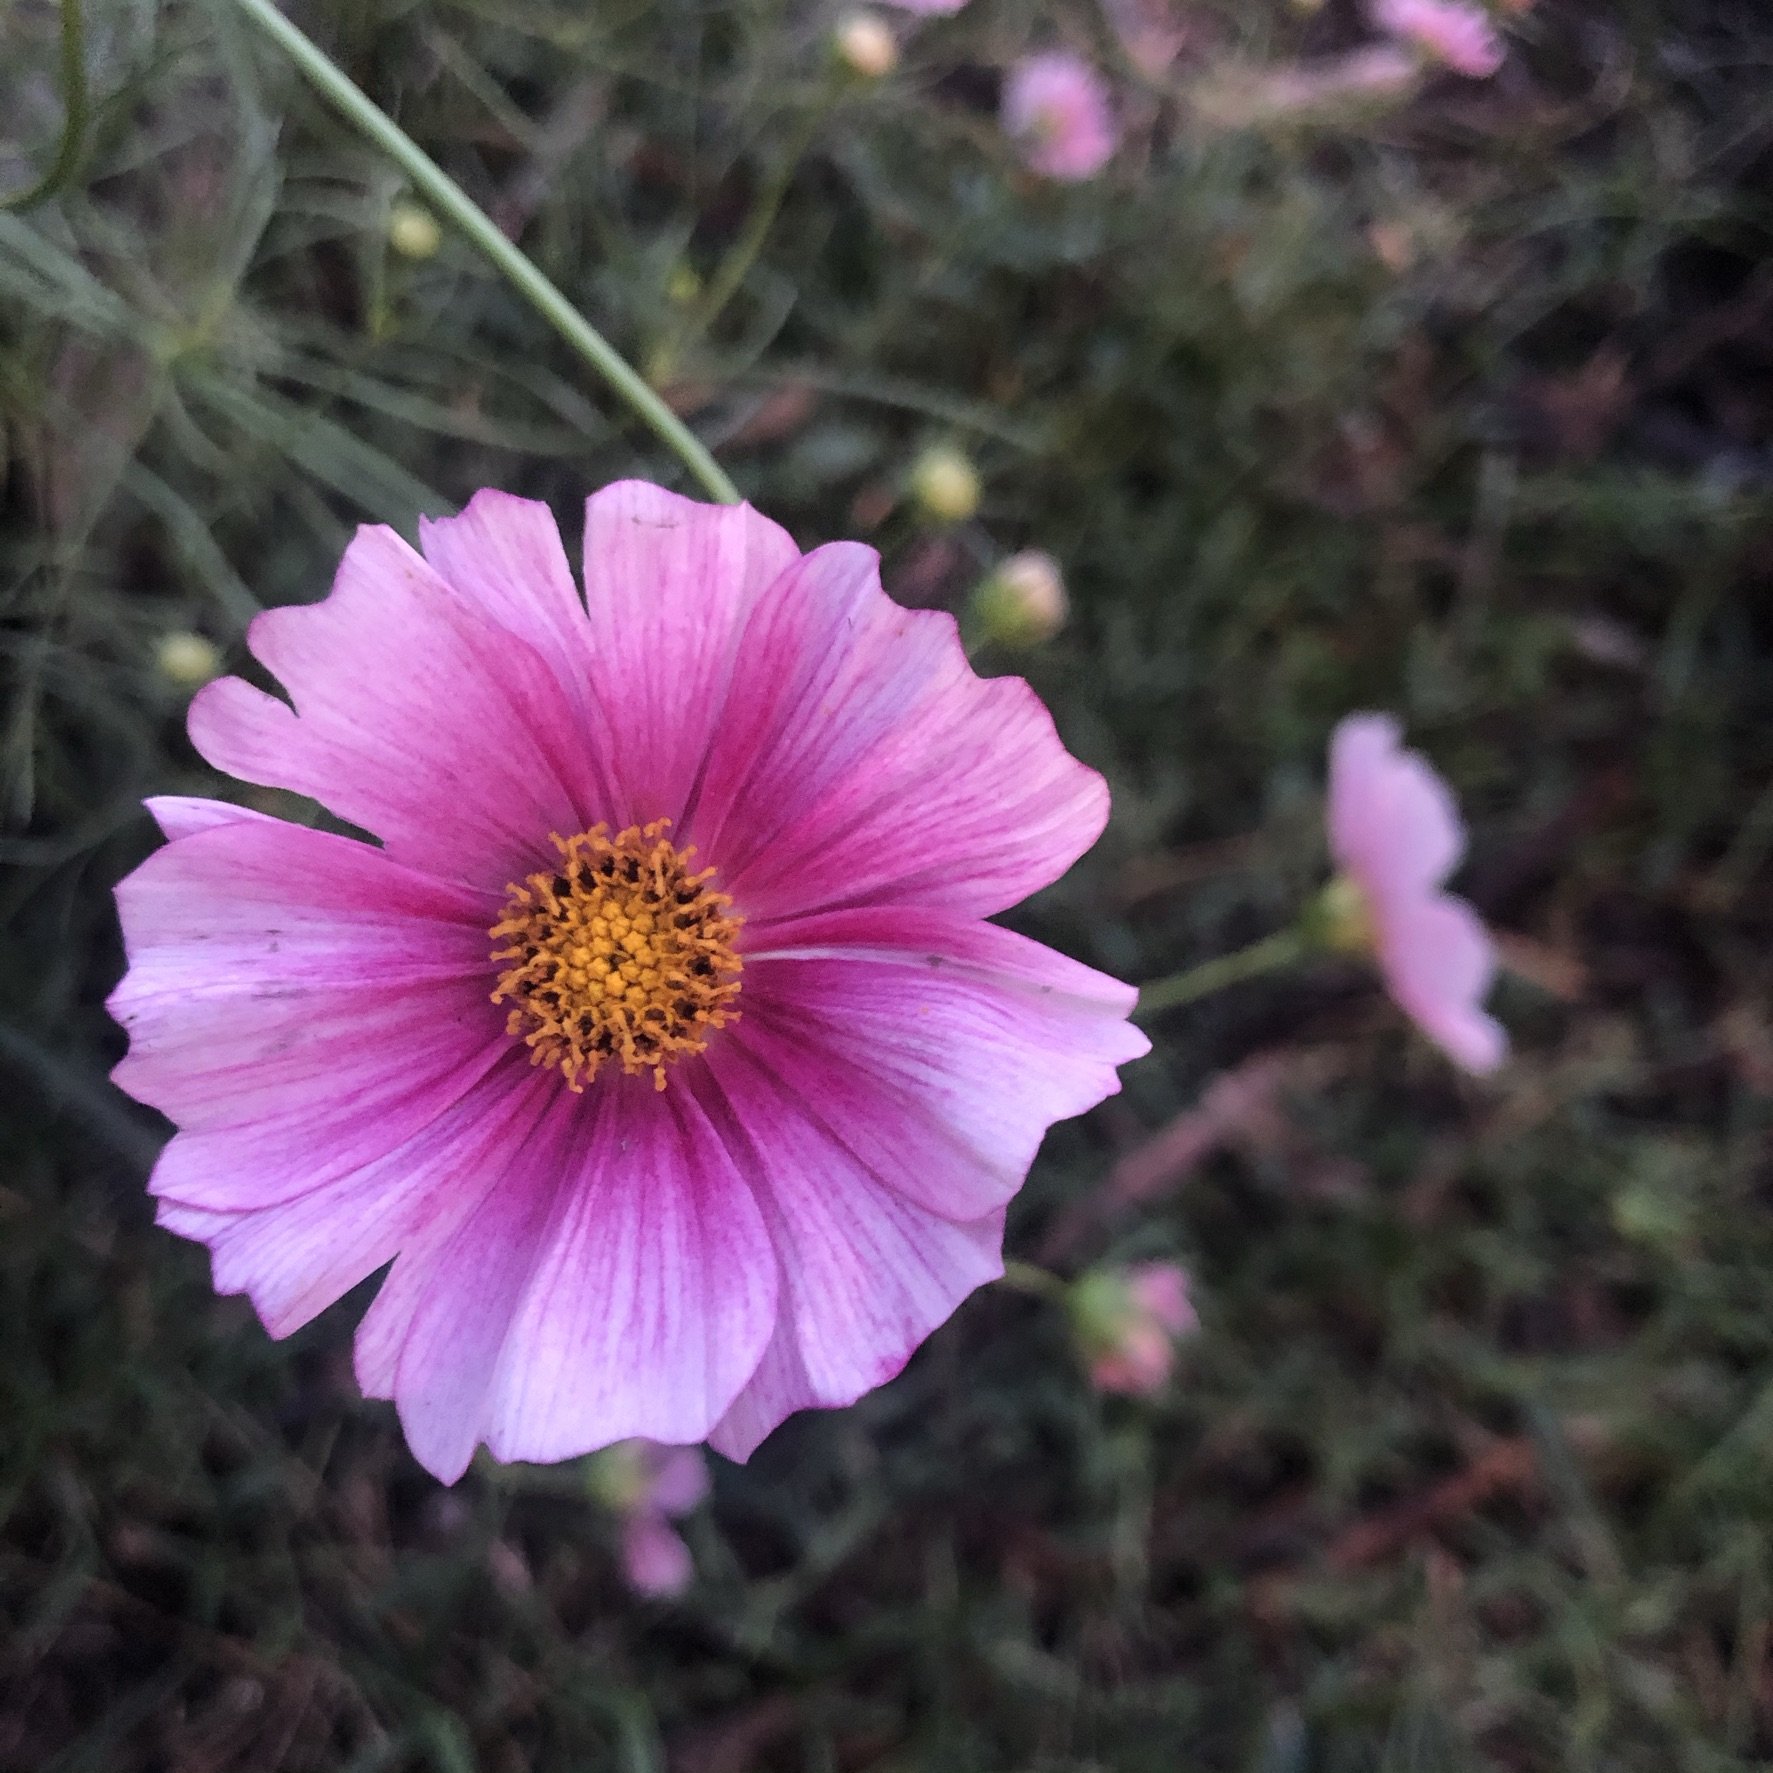
Cosmos can be directly sown into the garden.
Some plants dislike their roots being disturbed, therefore do much better when direct seeded outdoors and some seeds are so small and need special requirements thus needed to be started indoors. If you’re new to seed starting then I recommend reading my previous post on direct sowing vs transplanting to help you better determine how to start your seeds.


Spacing
Spacing according to seed packets is another thing that I typically ignore. When it comes to growing flowers for cutting you can usually grow your plants a lot closer than than what the seed packet recommends. 9 x 9 inch spacing is pretty typical for most cut flowers while larger flowers, like dahlias get spaced at 12 inches.
I personally grow the majority of my cut flowers at 6 x 6 inch spacing and find that they do very well for me. The more intensive that you plant your flowers, the more flowers you can fit in your space which also results in less weed pressure.
Tending to your Flowers
Pinching
Pinching is something that we do to seedlings when they are a few inches tall. This is also something that many gardeners have a hard time doing, but I promise, its worth pinching your seedlings. By pinching off the growing tip or the first set of leaves you will encourage the plant to branch out and grow bushier resulting in more flowers.
Plants that are not pinched will bloom a few weeks sooner than plants that were pinched but they will produce less flowers in the long run. So while pinching is not a necessary step, it is a beneficial one.
Not all flowers benefit from pinching. You do NOT pinch varieties that are single stem flowers like single stem sunflowers and stock. Be sure to make sure that your flower variety is not a single stem flower before pinching. These flowers produce one bloom and if you pinch them then you will terminate that bloom and it will never flower.
Staking
Once you have all of your flowers planted out, you are going to want to consider staking or netting your flowers. As your plants get large you may find that they begin to topple over, especially if you get strong winds or thunderstorms. This will result in your stems growing wonky and not being straight making them useless for bouquets. Plants that benefit from being staked include Cosmos, Dahlias, Zinnias, Snapdragons, Lisianthus, etc.
The most efficient way to support your flowers is by using flower netting. You can buy it fairly cheap and use stakes or t-posts to support the netting. Be sure to set it up while the plants are still small so that they can grow up through the netting.
If you don’t have a large amount of plants you can also stake each individual plant with stakes or bamboo poles.
Watering
As I mention earlier, you are going to need to make sure that your flowers get watered. In the summer you will need to water your plants daily and sometimes twice a day if you live in a hot climate. In the cooler months you are going to need to monitor them and water 2-3x a week, making sure not to overwater.
You can choose to hand water or use irrigation, a timed irrigation system is the easiest way to make sure that your flowers get the water that they need. I have used both drip irrigation as well as sprinkler systems and they both work just fine. I personally find sprinkler systems to be the easiest and most cost effective option while drip irrigations conserve the most water. Each method has it’s pros and cons.
You often hear many gardeners advise against overhead watering as it is believed to promote fungal diseases. I have personally used both systems and find that there is no difference between the two. In fact, because overhead watering mimics rainfall, I find that my plants looks healthier after a good watering, much like they do after a rain.
So do what works for you and what fits your budget and lifestyle. You may find that one method works better for you than the other.
Fertilizing
If you amended your beds and containers properly with compost and the appropriate slow-release fertilizers then you shouldn’t have to fertilize your plants for most of the season.
I do like to give my plants a boost once or twice a month with a foliar spray of fish and seaweed emulsion otherwise I only add more slow-release fertilizer if I notice any nutrient deficiencies or slow to grow plants. Container plants also will benefit from a monthly fertilizing of liquid fertilizers.
Pests and Diseases
If you’ve read any of my previous blog posts then you probably know by now that I practice regenerative gardening whenever possible. In all of my gardens I thrive to build self-sustaining ecosystems that balance out pests and diseases so that I rarely have to treat for anything. Small amounts of pests on your plants will do little damage to your crops and are necessary to keep the good bugs in your garden thus balancing out the bad bugs and keeping them from getting out of hand.
Creating a balanced ecosystem within your garden takes time so if you are new to gardening then you’re going to have to slowly build your garden up to being sustainable. Even if your garden has a healthy ecosystem you may still find the occasional pest or disease that needs to be treated. This is why is important to inspect your plants often and treat accordingly with an organic option if necessary before it gets out of control.
Some common flower crop pests and diseases include powdery mildew, caterpillars, aphids, mealy bugs and Japanese beetles.
Harvesting and deadheading
One final step in maintaining your cut flower garden and the reason you planted your flowers in the first place, is to harvest them! Once your flowers begin to bloom you will want to harvest your flowers often and deadhead any spent flowers that you can not use for bouquets and other flower uses.
Deadheading is simply the process of removing spent blooms from your plants. By harvesting and deadheading your flowers you are going to promote new blooms with your cut and come again annuals. Garden workhorses like zinnias, cosmos and snapdragons will put out blooms all season, as long as you keep up with harvesting them.
Annual flowers have a lifecycle with one goal in mind, and that is to make seeds. So once a flower begins to produce seeds, it will usually begin to die out, this is why it is important to remove the flowers before they go to seed in order to keep those flowers coming all season long.
Each flower has different harvesting recommendations, sometimes your seed packets will tell you what stage to harvest your flowers for the best vase life. If not you may want to do a little research on a particular flower to know when and how to harvest.
When harvesting, make sure to harvest your flowers in the early morning or in the evening while the weather is the coolest to prevent wilting. Using a clean pair of shears, cut your flowers, strip the leaves off of the lower stem and immediately place into a clean bucket of water. Once you have your flowers harvested, set them inside to rehydrate before arranging.
Extending the Season
One final tip for growing cut flowers is to protect your flowers from the elements when necessary. You may need to protect certain crops from extreme heat or freezing temperatures to help extend your growing season.
You can protect your tender flowers from freezing temperatures by covering them with a frost cloth. In my growing zone we get the occasional late season frost that could be detrimental to the warm-season crops that I planted out early. By covering with a frost cloth during freezing temperatures I am able to take a chance and plant warm-crops out a little earlier, giving me a head start on the spring growing season.
In hot climates, warm spring temperatures can sometimes heat up fast which is no good for cool-season crops. Planting your flowers in a location that gets some afternoon shade during the hottest parts of the day or by covering your plants with a shade cloth is a great way to extend the season for cool-season flowers. Some warm-season flowers like Dahlias will even benefit from a little shade during the extreme heat of summer.
And thats everything you need to know to successfully grow your own cut flowers!
I hope that you found this post helpful in your journey to starting your own cut flower garden, especially if you live in a hot climate like I do! I know that it can be intimidating to grow your own flowers but I promise, with the right knowledge, it’s not nearly as challenging as you may think!
My best advice is to just start, and if you fail that is okay because you can’t learn without failure. Every single gardener has failed at one point or another and even the most experienced gardeners still have experiences with failure from time to time.
So get out there, start a garden and plant some flowers, you won’t regret it!
Summary:
Get to know your climate and the growing conditions of each crop then plant accordingly
Pick a location free of invasive weeds, with full sun and close proximity to a water source.
Choose how you are going to grow your flowers, such as in-ground beds, raised beds, or containers, based on your budget and needs.
Plan your garden based on your needs and preferences and order seeds, plants and plugs.
Plant out your garden.
Maintain your garden by watering, staking, fertilizing and checking for pests and diseases regularly.
Finally, harvest and enjoy those flowers that you’ve worked so hard to grow!
Happy Planting!
If you found this information helpful please share the love by sharing or pinning this post! Also, feel free to leave any questions in the comments below!
Related Blog Posts


Are you looking to start a garden but don’t know where to begin? This post will help remove the frustration of starting a garden in 7 simple steps.